
Infographic: Visual Guide to Budget Allocation


What exactly is schema and how do you effectively incorporate it into your own SEO strategy?
There are so many mission-critical components to SEO that schema can oftentimes get lost in the shuffle. But schema is a small thing that can make a big impact, and we think it deserves a little more love! Here are some actionable ways to start using it in your own SEO strategy using Google’s schema markup tools.
Schema markup (schema.org) is a library of code that can be added to websites to help improve the way search engines display results in the search engine result pages (SERPs).
In layman’s terms, schema markup offers a way to help your website stand out in the search results. Attract more eyes (and more clicks!) when you make your organic listings POP!

Exciting stuff, right? Now, before you are swept away on the schema train, there are certain scenarios where schema is more beneficial.
Most commonly, you will see schema manifested as:
However, schema markup is most certainly not limited to these. Check out the full list at schema.org.
Generally, there are at least one or two categories that apply to any website. Businesses, reviews, articles, and products make up most of the content that is commonly supplemented with schema markup.
The simplest way to begin implementing schema is through the Google Data Highlighter or Google Data Markup Helper. Both schema tools are intuitive and designed to easily tag pages on your website. A great starting point if you’re just getting your feet wet with schema. But how do you choose which tool is best for you?
Both tools are wonderful, but depending on your comfortability with code and access to your website’s backend, one may be a better fit for your needs. Below we outline both tools, well as pros on cons to help you decide which will work best for you.
Ready to start tagging?
1. First, watch this quick tutorial on the Data Highlighter so you can see the tool in action.
2. Enter the URL of the page you want to begin tagging and choose the most applicable category.
 You also have the ability to select all similar pages (great for articles and products) or you can select that individual page for unique tagging (great for business information and event lists).
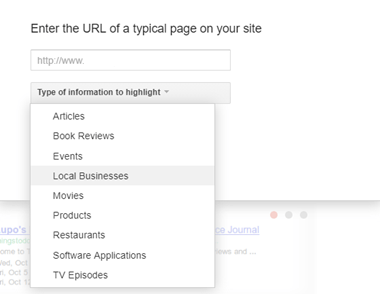
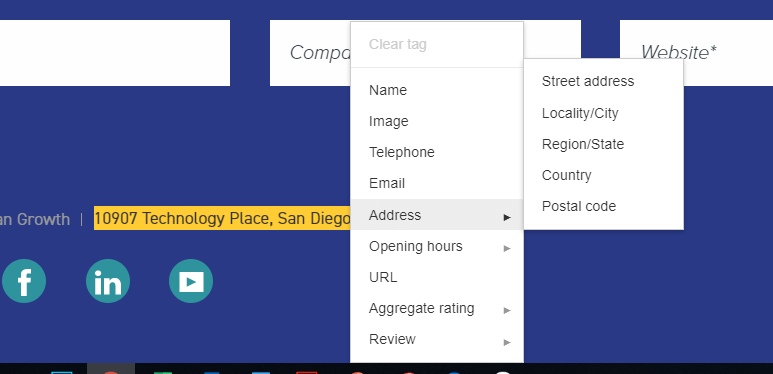
3. Start highlighting! Highlight the data you want to tag, and a drop-down will appear allowing you to identify the highlighted items. To the right of the screen, you’ll see the information required for the category you’ve selected, and the tags will populate as you highlight.
Google’s Data Highlighter interface is not without its quirks, but it is intuitive and offers a great starting point for getting your feet wet with schema.
Once you’ve highlighted your pages, you can review and manage all your tags in the ‘Data Highlighter’ section of Search Console.

Pros
Cons
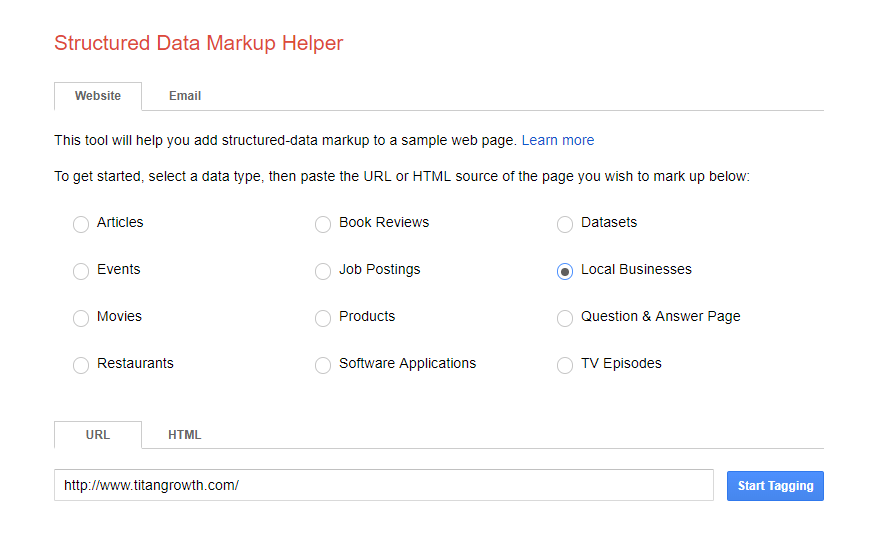
1. Enter the URL of the page you want to begin tagging and choose the most applicable category.
![]() If you only have html, you can paste that as well.
If you only have html, you can paste that as well.
2. Start tagging! After your webpage loads, highlight the data you want to tag, and a drop-down will appear allowing you to identify the highlighted items. To the right of the screen, you’ll see the information required for the category you’ve selected, and the tags will populate as you highlight.

3. Once your Data items are complete, select ‘Create HTML’.
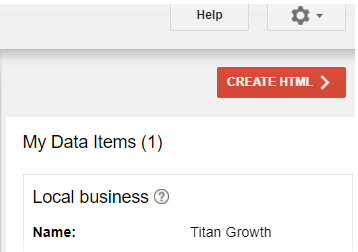
4. Implement the markup: add each code item as highlighted in the tool, or download the generated html file and paste into your source code.

Pros
Cons
In either scenario, use Google’s Structured Data Testing Tool to preview your page with the markup, so you can troubleshoot any potential bugs.

When it comes to schema, less is not more! Feel free to markup any content you feel is relevant, as long as it is visible to people who will be visiting the webpage.
What is the bane of small B2C companies who advertise on Google Shopping?
It’s probably Amazon. Or another distributor. Maybe more than one!
Do they carry a product similar to yours? Likely yes.
Is the shipping or price cheaper than yours? Quite possibly yes.
But—and this is the big one—can you still compete with them?
Definitely.
When it comes to outsmarting your Google Shopping competitors, you can’t treat it like Google Search. After all, you don’t have keywords or ad copy. But even with the rise of automation, there are still ways to optimize and win—especially against big companies who have a lot more things to pay attention to than you do.
You can gain data insights for collection and comparison by separating your products into different ad groups—not just product groups. But this isn’t a surefire win for every account. You need to have a small enough catalog to pay attention to individual performance.
While it may not work for every case, there is a balance.
If the ad group is too small, then automated bidding won’t have enough data. If you go too granular, you may not have enough time to optimize each group. But, if you go too big-picture then you lose analytical capability.
In general, if you have a smaller group of products or high sales volume relative to the number of products, then try separating your products into ad groups.
If you have a larger amount of products, this is just one of multiple strategies.
Product groups:
Ad groups:
There are a few different ways to segment your campaigns and ad groups. Choose the most relevant differentiators that set your products apart or that reflect your overall goals.
Consider:
For example, if your entire store focuses on one target market and everything has a similar price, then you may want to focus on simply selling the most products.
On the other hand, if your company sells a large variety of men’s and women’s products of all kinds, and has high sales volume, then make sure you set yourself up to gather data on all of your products.
Some products spend large amounts of money but rarely convert. If your account has one (or several!) it will be immediately obvious upon viewing the data.
For example, try identifying the money sink in this campaign.
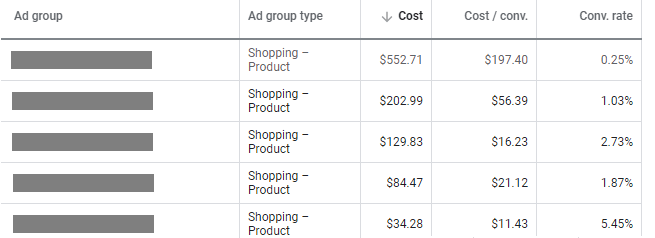
Sometimes products with very interesting or eye-catching pictures can draw more than their share of clicks. Usually, having an interesting picture is good. However, if the product is particularly niche and there is a mismatch between expectation and reality, these clicks can waste a lot of money.
If you see that one ad group or product group is spending more than their share of money but not improving ROI, you only have two immediate options in Google Ads.
Option 1:
Option 2:
Neither of these are great long-term options.
For further troubleshooting, consider:
Once your campaigns are set up to gather effective data, you can begin using the hard numbers to your advantage on top of automation. To most effectively compare your performance to Google Shopping competitors, you need enough activity to view the detailed Auction Insights Report.
Here’s where you start to pull together numbers and charts. Stick with one campaign or even ad group at a time—otherwise, it can get complicated.
For example, say you have an ad group containing a single menswear product from your small company.
If you go to the Overview tag and look at the Auction Insights > Overlap Rate to Outranking Share, you can see which Google Shopping competitors’ ads show up when yours do.
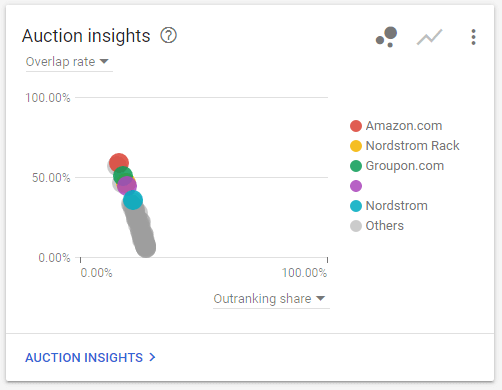
It looks like we’re often showing up at the same time as Amazon, Nordstrom, and other large companies. Worse, their ads usually show up above ours.
The secret is, that doesn’t matter.
You don’t beat a giant by fighting head-on; you beat them by finding your own niche.
Pay attention to something else: where you should, and shouldn’t, be competing for space.
Because in the auctions that you and Amazon are competing, take a look. Your overlap is 8-16% higher on tablets and computers. In fact, your products are most likely to outrank Amazon’s when they show on computers.

But how valuable are those placements to you? Check the Overview tab’s Devices card.
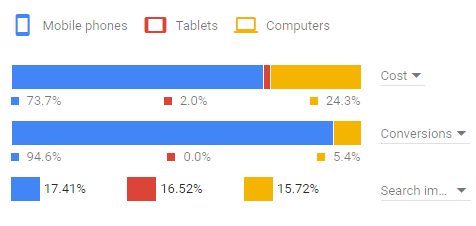
As it turns out, not so valuable.
So why are we wasting time competing with Amazon for placements that waste your money? Let’s bid down on those placements for this ad group.
And when we look at the previous image, we see something else: it looks like mobile phones are a disproportionately valuable placement for this item. In fact, we’re spending far less on it than we could, and it’s the placement that Amazon has the least impression share in—so we’re less likely to be competing with that industry giant at the same time that we bid on our most valuable placement.
Let’s bid up on mobile phones to compete in the auction that’s actually relevant to our success.
Maybe your Devices card will end up looking like this:
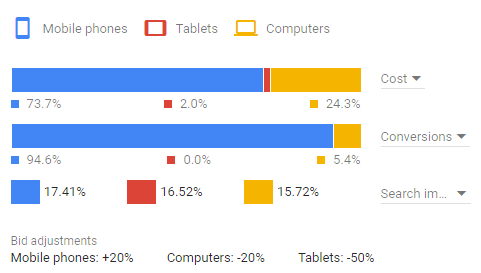
Give it at least two weeks to gather data, then compare performance and find another opportunity for improvement.
Competing with industry giants in Google Shopping is never easy, but small eCommerce companies can succeed by finding niches that their larger competitors aren’t paying attention to. Your advantage is being able to pay attention to the small details, so make use of it! Contact us if you need help with Google Shopping Management!